Your brand’s logo is more than just a visual mark; it’s the face of your business, representing your values, mission, and identity to the world. Crafting a memorable and impactful logo requires careful consideration and a systematic approach. Here’s a step-by-step guide to help you navigate the process of logo design
Contents
- 1 Step 1: Define Your Brand Identity
- 2 Step 2: Research and Inspiration
- 3 Step 3: Sketching and Conceptualization
- 4 Step 4: Typography and Iconography
- 5 Step 5: Digitalization and Refinement
- 6 Step 6: Feedback and Iteration
- 7 Step 7: Presentation and Finalization
- 8 Step 8: Delivery and Documentation
- 9 Step 9: Launch and Implementation
- 10 Step 10: Evaluation and Evolution
- 10.0.0.1 The Ultimate Guide to Designing Your Own T-Shirts
- 10.0.0.2 Designing Your Brand’s Identity: A Blueprint For Logo Creation
- 10.0.0.3 5 Delicate Fonts For Your Wedding Invitations
- 10.0.0.4 6 Handwriting Fonts For Creative Projects
- 10.0.0.5 Boost Your Drawing Skills With 4 Tips
- 10.0.0.6 A Clear Guide To Making Embroidered Necklaces
Step 1: Define Your Brand Identity
Start by defining your brand’s core values, personality, and unique selling points.
Consider your target audience and what emotions or perceptions you want your logo to evoke in them.

Step 2: Research and Inspiration
Research your industry, competitors, and current design trends to gain insight into what works and what doesn’t.
Draw inspiration from a wide range of sources, including nature, architecture, art, and typography.
Step 3: Sketching and Conceptualization
Begin by sketching out rough ideas and concepts based on your research and brand identity.
Experiment with different shapes, symbols, and letterforms to explore various design directions.
Step 4: Typography and Iconography
Choose typography that reflects your brand’s personality and values, whether it’s classic, modern, or playful.
Develop or select symbols, icons, or graphic elements that represent key aspects of your brand identity.
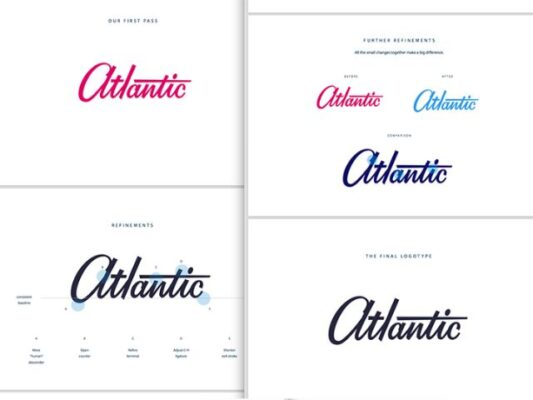
Step 5: Digitalization and Refinement
Transfer your hand-drawn sketches into digital format using design software.
Refine your designs by adjusting proportions, refining details, and experimenting with color palettes until you achieve the desired look and feel.
Step 6: Feedback and Iteration
Share your designs with trusted colleagues, friends, or focus groups to gather feedback.
Iterate on your designs based on feedback, making revisions as necessary to improve clarity and effectiveness.

Step 7: Presentation and Finalization
Present your finalized logo designs along with rationale and explanations behind your design choices.
Provide mockups or visualizations showing how the logo will appear in various applications and contexts.
Step 8: Delivery and Documentation
Prepare the final logo files in different formats suitable for print and digital use.
Create a brand style guide outlining logo usage, color palettes, typography, and other visual elements to ensure consistency across all brand materials.
Step 9: Launch and Implementation
Roll out your new logo across all brand touchpoints, including your website, social media profiles, marketing materials, and physical signage.
Monitor customer feedback and make any necessary adjustments to ensure the logo resonates with your target audience.

Step 10: Evaluation and Evolution
Regularly review and evaluate the effectiveness of your logo in representing your brand identity and resonating with your audience.
Be open to making updates or refinements to your logo over time as your brand evolves and grows.
By following these steps and investing time and effort into the logo design process, you can create a distinctive and memorable visual identity that sets your brand apart and resonates with your target audience for years to come.
Related Posts
- These 5 Fonts Are For Nature Lover
- Let’s Spread NEA’s Read Across America
- Celebrates US As A Nation Of Diverse Readers